First time playing with the Blender Game Engine. Made the ball move with keys from the user, used physics to make the dominos fall, textured everything with UV Mapping and GLSL Shaders, and had fun XD
Wednesday, May 25, 2016
Steps in Making Kiko
This short video shows the steps I took in order to create my OC Kiko. I sketched, lined and scanned the drawing, put it into Illustrator to trace it, then filled in the color and added details.
Thursday, May 19, 2016
Final Production - End of the Year Summary

Illustrator Project - Kiko the Rogue


Above shows the steps of progress as I worked on the project. It started out as a sketch that I lined, then scanned and turned into line art to color in Illustrator. I added detail to the eyes, added light and shadow, and overall made the production more realistic using a digital tool for the first time. I have many more sketches that I am going to scan and make into line art too. Next time I'm hoping to try tracing the lines by myself and then adding a background. Backgrounds are hard if you want them to look more realistic and I'm expecting to struggle and hate whatever I make, but you have to start somewhere to get better, right? (Original Links: Kiko1, Kiko2, Kiko3)
Video Games Using Unity


 Since I am interested in the production and design of video games, I decided learning how to use a game engine would be beneficial. So I made two mini games in Unity using their tutorials online: Roll-A-Ball and Space Shooter. I enjoyed making them and learning basic game creation with physics, coding, building the level, and so much more. In my Animation class, we are currently practicing using the Blender Game Engine too. Next year I plan on making my own video game without the help of tutorials. Next year I am also taking AP Computer Science so I am hoping my coding skills will be refined enough to code something complicated. I'm thinking either a puzzle game or some sort of fighter. My favorite would be if I could make a first-person shooter but... that may be a bit complicated.
Blender Models and Animations


 Of course, since I am a digital modelling student, there is modelling and animation. Here are some pictures of small projects I did for fun. I did a whole post on the sword pictures and I'll link it here: Sword Post. I learned about lighting, modelling, making textures using nodes, mapping realistic picture textures (rocks), making grass with particles (made a couple variations of grass and had them randomly spread), and learned how to control the global world to change the sky (added color and used noise to make clouds). Of course for more details you can just click on the previous link. The light saber I made during free time in computer science this year but I modeled it using a reference picture and had to play around with materials and nodes again. I'm not posting any of my animations because you can just go through my blog and watch some, but I will talk about them here. This year's animation class taught me a lot of stuff that I did not know previously (that's the point of the class XD) and it will definitely help me in the future for the job I want. My favorite project I worked on would have to be the character animation. I animated Sintel and made six different actions. I am proud of it even though it is a bit rough, but it was the animation where I added the most detail and tried to make it as realistic as possible. Link: Sintel Post.
Trend Video: Open World Games
I am also quite proud of the video my teacher had me do for NCCAS. I thought the finished product was going to be way worse than how it actually turned out. Since I am not a film student and the only times I've used Premiere Pro were in Animation class with a whole different media, I was expecting a video that clearly reflected my inexperience. Maybe it still shows that (idk XD) but I am still very happy with how it turned out... Working on it was also very addicting. While it was time-consuming, it felt valuable; I love projects that take a lot of time and challenge me. This school year my teachers for some reason all really got into video projects so I had to make three of them this year. While they were stressful and a lot of work, I am glad I learned the skill of video making. In my college years I am going to attempt being a YouTuber so the practice of recording and editing videos are needed. Later when I make a reel for a job will also be useful. From this experience, I also learned that having good applications are a must... MovieMaker sucks and Premiere Pro is an angel (I'm buying it now XD).
Drawing
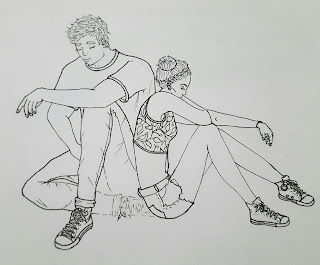
This year I drew a lot and, at the end, experimented with colored pencils, markers, and Copic markers. I am not going to post all of my drawings, they are all on my blog, but the one I am posting I have to say is my favorite. This is a more recent drawing where I think someone can clearly see the progress I made with more realistic people, details, and the interaction of two figures. This is one of the drawings I am also planning to put in Illustrator and I'm very excited.
Most of what I worked on this year were smaller, finding-myself projects. I spread myself out to find my niche and I enjoyed everything I worked on. I believe I fulfilled my goal from the beginning of the year (LINK: Goal) of tackling character creation and modeling with fantasy and war themes. In fact, character creation is what I mostly did this year. I have a ton of sketches and notebooks filled with people, backgrounds, descriptions, worlds, everything. I also played with weapons and armor in my drawings and models. The only thing I failed to do was creating environments. I did learn how to make grass, rock, and sky as I said above; however, next year I am hoping to explore in world building more (not just the writing part but the drawing, modeling, art part). While I was not very sure what direction I was going to find myself heading at the beginning of the year, this year of portfolio helped me a lot to find and refine what I enjoy to do. Next year when I have two portfolio classes.. it is going to be amazing and I cannot wait.
Sunday, May 15, 2016
Open World Video Game Trend
Sunday, May 8, 2016
Eight Tips on Editing a Video
Right now I am working on three video projects... cry. Since I have no experience in any way, shape, or form in the film world, I decided to (as usual) research away. I found these eight tips very helpful on how to edit my videos and decided to share (especially since I'm about to live my life by these tips because editing is so time-consuming).
1. Maintain a Project Directory
When starting a project, it is easy to just load everything onto your Desktop and hope for the best. Don't do that. Instead, create a project directory. Create a folder, and in that folder, have more folders labelled for every different type of media. Load your content into their specific type. Why? ORGANIZATION. Now while I'm editing there will be an easy flow of work and easy access rather than "where is that one clip that I need?"
2. Have Two of EVERYTHING
Failed hard drives and memory cards. Sound familiar? To me it does ;-; So, keep a copy of stuff in a separate location. If disaster strikes... you're going to be okay. Also, when the project is over, store everything on another hard drive and delete the files off your main computer.
3. Trim
Don't just load a clip on a timeline and be done with it. Trim the beginning, end, awkward moments of silence, etc. Keep it interesting for whoever is watching.
4. Choose Wisely
When needing a video editor, use one you know or one that is easy to learn so your project doesn't take forever when so far you've been looking at buttons and fancy features. Just do simple stuff if you're new (AKA me). Right now, I'm using both Premiere Pro and MovieMaker for different projects... I hate MovieMaker to say the least. With a passion. And when in doubt... Google or YouTube it.
5. Avoid Jumpcuts
If you have film with "um" and "uh" or pauses and messups... cut them out and use cutaways in these awkward moments. It will look like the speaker/actor said/did things without a hitch. Use advanced editing programs for this such as Premiere Pro.
6. Second Sound Source
If you want clear audio, don't use the camera (learned this the hard way). If possible, use a better mic and a separate recording system. Then you have to sync the video to the audio (pretty hard though so try to avoid complicated stuff). If you don't have a mic or equipment... do your best (AKA me again, don't judge me).
7. Vary the Shots
Keep the video visually interesting. Vary angles, shots, design elements, etc. Just don't do so many cuts that someone will have an epileptic seizure. That means you're doing it wrong.
8. Tell the Story
Always tell the story when editing (beginning, middle, end, etc.). You need structure and professionalism. While it may not be perfect (because you are not a professional editor), just remember to have fun with it.
I REALLY need as much help as I can get on these videos and I'm glad I have the internet and my teacher to help me out XD (Especially since one of the videos has to be 40 minutes long ;-; wish me luck!)
Monday, May 2, 2016
Schedule - 4/18-4/22
Monday - Character Design
Tuesday - Field Trip - Not Here
Wednesday - Character Design
Thursday - Line Art
Friday - Illustrator
Tuesday - Field Trip - Not Here
Wednesday - Character Design
Thursday - Line Art
Friday - Illustrator
Voice Keying: School...
Practice voice keying on Suzanne with a quote from the infamous Ferris Bueller.
Sunday, May 1, 2016
Copic Markers

First of all, this product has it's own amazing and informational website where I've gotten this info and the link will be here: Copic Website.
Second of all, I will not be talking about all of their professional products but just the markers (otherwise we'll be here FOREVER). So let's just jump on in.
Copic makes high quality alcohol markers that are ideal for all styles of art, design, illustration, you name it! And they are also durable, refillable, and have replaceable nibs, meaning you only need to buy a marker once.
The website also highlights six guarantees:
Vibrant, Smooth Coloration
Copic ink applies smoothly and is easy to blend. The alcohol based ink dries acid free and does not destroy paper fibers the way water based inks do. Also, the open time on uncoated papers is limitless, so you can go back and re-wet the ink years later.
Permanent & Non-Toxic
Copic markers are free of harmful chemicals and overwhelming odors, making them much more enjoyable to use than other brands.
Refillable
Once you purchase a marker, it is yours for life. By simply refilling the marker and replacing damaged nibs, your marker will last a lifetime.
Dependability
Copic markers will not dry out when not in use. With a guaranteed 3-year shelf life, your investment will not waste away in storage.
Quality Tested
Each marker is hand-tested for overall quality and color consistency three times before it is shipped from Japan.
Super Brush Nib
This unique, flexible brush allows for smooth blends and paint-like application. No other brush marker on the market has the feel and quality of the Super Brush nib.
Copic also makes four different types of markers!!

Classic
This marker is the original line of art tools. Classic markers are most popular among Comic Artists, Architects, Product Designers, Graphic Designers, Industrial Designers, Calligraphers, Quilters, Scrapbookers, and for journaling and mixed media arts.
Features:
Square barrelABS Compatible
Holds the most ink
Available in 214 colors
Refillable - 9 refills from just one Various Ink bottle
Classic Sets: available in a variety of combinations
Includes a Broad Chisel nib and a Fine Point nib
9 nib options: Brush nib, Standard Fine nib, Standard Broad nib, Semi Broad nib, Soft Broad nib, Super Fine nib, Round nib, Calligraphy 3 mm nib and Calligraphy 5 mm nib

Sketch
(My markers :3) Sketch markers come in the widest range of colors, and feature the Medium Broad and Super Brush nib combination. The responsive and flexible Super Brush nib delivers a wide range of marks and makes blending easy. The Super Brush nib feels like a saturated, long lasting, flexible brush that never frays. It gives artists the ability to spread ink smoothly in a manner similar to watercolor. The other end has a Medium Broad nib with a firm chisel tip, perfect for airbrushing and coloring large areas. Sketch markers are commonly used for comics, storyboard illustration, fashion design, interior design, manga, anime, landscape architecture, rubber-stamping, mixed media arts, tattoo arts, calligraphy and more!
Features:
Oval barrelABS Compatible
Available in all 358 colors
Refillable - 12 refills from one Various Ink bottle
Sketch Sets: available in a variety of combinations
Includes a Medium Broad nib and a Super Brush nib
3 nib options: Super Brush, Medium Broad and Medium Round

Ciao
The Ciao marker is the most economical Copic marker, providing the same great quality and experience as Sketch, but at a more attractive price. The Medium Broad nib allows for thick strokes while the Super Brush nib works great for variable-width strokes.
Features:
Round barrelAvailable in 180 colors
Refillable - 15 refills from one Various Ink bottle
Includes a Medium Broad Chisel nib and a Super Brush nib
2 nib options: Super brush nib and Medium Broad nib
Come with a child-safe cap that features small air holes
Ciao Sets: available in a variety of combinations

Wide
Wide markers are the premier choice for coloring large areas with a consistent stroke. Their large nibs are excellent for calligraphy, architectural design, graffiti, product rendering and coloring backgrounds. They feature two replaceable nib options and are easy to refill.
Wide markers are the premier choice for coloring large areas with a consistent stroke. Their large nibs are excellent for calligraphy, architectural design, graffiti, product rendering and coloring backgrounds. They feature two replaceable nib options and are easy to refill.
Features:
Flat barrelAvailable in 36 colors
Comes with a 3/4" wide nib
2 Nib Options: 18 mm and Broad Calligraphy
Refillable - 7 refills from one Various Ink bottle
Wide Sets: available in a variety of combinations
Copic also has a ton of videos and question boards for customers to watch and read. They also provide classes on how to use their products and a lot more. I'm excited to use my Copic markers and hopefully master them professionally.
Schedule - 4/25-4/29
Monday - Finished Illustrator character
Tuesday - Found out my XBox 360 does not work on the laptops
Wednesday - Recorded Skyrim gameplay
Thursday - Recorded Assassin's Creed III gameplay
Friday - Recorded voice over
Tuesday - Found out my XBox 360 does not work on the laptops
Wednesday - Recorded Skyrim gameplay
Thursday - Recorded Assassin's Creed III gameplay
Friday - Recorded voice over
Production Checkpoint #4

I finally finished it!! (Sorry for the crappy picture, I'll put up a better picture later). It took me... two months? AKA wayyy too long but I think it was worth it. Even though there were many challenges such as never using this program before, not understanding the tools, things not working like I want them to, etc, I still enjoyed making this very much and I'm proud of the outcome.
The whole class right now is also working on these videos for either a motion artist or a current trend. I have a current trend and (as you know), picked open world video games as my topic. I have made LOADS of progress on the video this week. I brought in my XBox 360 and played Skyrim and Assassin's Creed III in the art room where it was kinda awkward with all the people and feeling bad for turning off all the lights but... I have two thirty minute videos of gameplay I now have to look through for my video. I'm really excited because I actually think mine is going to be pretty good (I don't do film stuff so... hopefully XD). I also have my voice over audio recorded and all I have to do is go through and edit out all of my mistakes. So I believe I'm on a very good track for that right now. I'm also working on a 35 minute video for my APUSH class... maybe I'll be allowed to borrow a tri-pod because I've realized how useful they are XD

And don't worry, I'm also still drawing. I recently did these two drawings specifically for my new Copic markers (THEY'RE AWESOME) but as you can see, I've only played with the skin color on one of the drawings. I have been watching multiple YouTubers techniques on how to use these markers so hopefully when I go to use them... it wont ruin my sketches XD
That's all I have been up to since the last production checkpoint. It's getting closer to the end of the year :( and my goal is to 1) finish this trend video and 2) finish that video game in Unity I have abandoned for a reallyyy long time. (And 3) more digital art :3)
Subscribe to:
Comments (Atom)